If you live in the northern part of the US, you know that the summer driving season isn’t all that long. Combine that with a serious lack of available track time, and a “home movie” of your time behind the wheel is just what you’ll need to pass the hours until next season. But that means you’re going to have to begin shooting now.
With so many options out there, what’s the best video setup for your car?
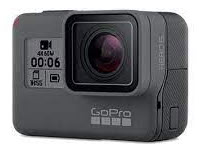 My first choice was a GoPro Hero 6 Black. I bought it in 2019 from Amazon right after GoPro released the Hero 7. I got the Hero 6 because it was about $100 less than the Hero 7 and it shoots the same 4K UHD (ultra-high-definition) video at 60 fps (frames per second). That speed is ideal for doing an analysis of your line going through Big Bend or the left-hander at Lime Rock Park (my home track) but obviously, it works equally well everywhere else. Although to be fair, you’re also going to need some specialized software to see some performance metrics. Look for that in an upcoming column.
The Hero 7 and the Hero 8 received progressively better image stabilization software and to my mind, the question was ‘is it noticeably better?’ That depends on your definition of “noticeably.” If you’re on the road or at an AutoX course, you probably won’t notice the difference. If you’re continually hitting the rumble strips on the track, you might see some vibration on the video. Take that into consideration when you make your choice. The biggest physical difference on the Hero 8 is that the mounting plates are part of the camera. That makes an external case unnecessary.
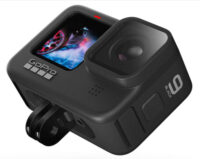 The Hero 9 Black – my latest camera – is a whole different animal. To start with, it comes with mounts that fold up flat. The camera shoots 5K video – which is stunning – and can shoot from 30 to 240 frames per second. You can use the camera to shoot video, still photos, and time-lapse photos. Each of those has several preset options. For Video, the options are (standard, activity, cinematic, and slo-mo); for photos, the options are photo (wide), Live Burst (wide) iBurst (auto wide). And in Slo Mo, your options are time warp, time-lapse and night lapse. But the coolest part feature is that you edit those or you can create your own presents. Need a slower frame rate? Easy. Special white balance modes? Yup, you can do that too. Oh, and you want the image to track the horizon or stay fixed. Everything is adjustable.
Pro tip: Get the optional Media Mod when you place your order. That will get you a built-in directional mic with wind suppression, a 3.5mm mic port, an HDMI-out, two cold-shoe mounts, and tough weather-resistant construction.
Your GoPro comes with sturdy plastic housing and some basic adhesive mounts, but you’re going to want more than that. I wanted the flexibility of being able to take videos of myself while I am driving, as well as videos of the road (ahead and behind me). That meant I needed a mounting system with a suction cup base. These are three of the basic options:
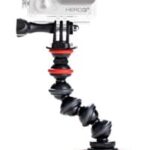 I started out with 6-inch gooseneck-style mount. The one I picked out has a 2 ½” suction cup on one end and a hot shoe-style mount on the other. My thinking was that I could stick the suction cup anywhere on the car (front window, hood, fender, door, or rear deck) and bend the neck into any position I wanted. And I could, but there was a hitch. While the suction cup never budged, if the road surface was too uneven, the gooseneck had just enough flex in it that the camera jumped. A SteadyCam it is not.
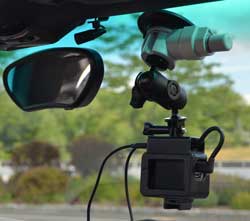
 Mount number two has a larger 3″ suction cup base and a removable 3” hard plastic arm. The arm has zero give in it – once you lock it into place, it stays there. That eliminates the bouncing video problem. But after a day at the track, I realized it still wasn’t quite right. Although there were several adjustment points (and with some additional fittings it could be positioned into almost any position), it still wasn’t as flexible in terms of camera angles as the gooseneck mount. Plus, all those additional fittings to make the camera angles possible extended the length of the arm. I needed something with the flexibility of a gooseneck and the stability of a hard plastic arm. I needed a Super Knuckle.
What’s a Super Knuckle you ask? It’s a professional-grade mounting system with incredible flexibility. Designed by a company called Kupo, based in Elmsford, NY, the Super Knuckle system uses a ball and socket approach. They offer a wide variety of interchangeable parts that allow for 360-degree movement on both the x- and y-axis. In other words, there is no camera angle you can’t get.
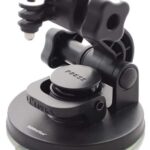
For my needs, I selected 2 bases. For videos that require the camera to be mounted on the hood, a window, a door, the rear deck, or any other flat non-porous surface, I chose the Super Knuckle Suction cup base. I can also use this to shoot videos of me while I’m driving, but the camera is positioned at eye level. Occasionally I want an “up” angle, and for those videos, I got a Super Knuckle Cup Holder mount.
Now you have to connect the camera housing to the mounts, and for that, you need a Super Knuckle GoPro mount.
 The magic – what ties the system together – is the Super Knuckle itself. Insert the ball on either base into one end, and the ball on the GoPro into the other. Then you lightly tighten the screw. This allows you to bend the whole thing into the position you want. Tighten the screw all the way and you’re done.
One thing to note. Krakatoa erupting couldn’t shake any of these suction mounts off your car. But the rules say you won’t be allowed onto the track unless the camera is inside the vehicle. Cameras mounted outside the car require a tether. That prevents them from flying off and creating a debris problem on the track. The tethers themselves are cheap but they stick to the surface with adhesive. I don’t know about you, but I’m not sticking anything to my paint.
The first thing you’re going to notice when you watch your video is the wind noise. If the camera is inside the car, it’s not too bad. But if the camera is outside the car, especially on the hood or the doors, it’s loud. And right after you notice the wind, you’re going to notice a lack of exhaust sounds on your video. That’s because the built-in GoGpro microphone is OK if you’re on your bike, hiking through the woods, or is strapped to your dog’s back, but it is useless when it comes to hearing you blip the throttle while running through the gears on a twisty road.
If you want to get really serious about your audio, then you’re going to want to hear some exhaust noise. That’s going to take an external microphone with a windscreen. You’re also going to need an adapter and a long cable to do it. I picked a small Olympus stereo microphone. It tucks nicely into the small space between the license plate and the bumper directly above the exhaust.
You’re going to want to fine-tune the settings on the GoPro so that it separates the audio from the video tracks – something it doesn’t do by default.
This is one of the new settings that was introduced with the HERO5 Black. It allows you to create a separate audio track at a higher quality than the one embedded into the mp4 video file. In other words, it’s a standalone detached audio file. (Cool, right?)
The default is Off. There’s no separate audio file created, so you use the one embedded in the mp4 video file.
Low creates a separate WAV file and applies minimal processing and will often sound the worst straight out of the camera. It’s the closest to a true raw audio feed, so it’s a good option if you’re planning to work on the audio track in audio software or video editing software.
The Medium creates a separate WAV file. This setting’s behavior varies based on whether you have the Manual Audio Control setting on or off. If you have it set to either wind or stereo, it will respect that. If you have Manual Audio Control switched off, the Medium setting here will switch automatically between wind and stereo depending on which it calculates to give better results.
The High setting creates a separate WAV file and applies the maximum amount of in-camera processing on the audio, including automatic gain and AAC encoding.
Replace the basic camera holder that came with your GoPro. Look for one that holds both the camera and the microphone adapter. That way, you’re not struggling with trying to find a way to secure the thing. There are several case options that suit this purpose – the one I picked holds the adapter under the camera.
You’re also going to want to download the GoPro app onto your phone. It works really well, allowing you to see the shot before you start recording, and to start / stop your camera remotely. That’s a really nice feature to have when you’re on pit lane and don’t want to have 5 minutes of waiting time on your video before you’re waved onto the track.
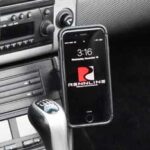 The last thing you should get is a mount for your cellphone. There are a number of cellphone holders out there but if you’re going to use it during spirited driving, you want one that the cellphone won’t fall off of. I got mine from Pelican Parts. It’s by Rennline and is designed specifically for a Porsche 986/996. The viewing angles are infinitely adjustable and it holds the phone firmly in place.
Not many of us – myself included – are ever going to be a world-class movie director. Cecil B. DeMille, Alfred Hitchcock, Martin Scorsese, Ron Howard, and Spike Lee ain’t got nothin’ to worry about. But if you’re going to try, this equipment list will set you up to succeed.